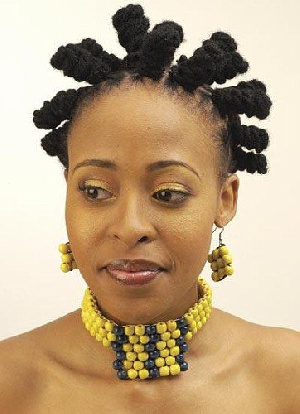
Bantu knots also known as Zulu knots originate from the Zulu tribes of southern Africa near the Sea of Durban.
Bantu knots are created when the hair is sectioned off and twisted into knots. The shapes of the sections depend on how the hair is parted, and can easily be made into diamond, triangle or square shapes, but the possibilities are endless.
This hairstyle can be worn on any hair type and any hair length, although it is popular amongst people of African descent.
So ladies let’s look stylish and different by rocking in the African Bantu Knot by taking notice of the steps below:
Thoroughly Wash, Condition and Detangle Hair
Ladies always make sure to get the scalp particularly clean, as much of it will be exposed, and the last thing you want is for product buildup to leave you scratching your head and ruining your style.
A leave-in conditioner will help protect tresses and keep flyaways in check while you detangle your hair to prepare for styling.
Part Damp Hairs into Sections Using a Comb
Creating precise parts is a crucial component of having great Bantu knots. Use the end of a rattail comb for best results and divide hair into small, medium, or large sections, depending on the length of your hair and the ultimate style you want.
Use smaller sections for shorter hair—as tiny as ½-inch wide or smaller, for the shortest locks—and larger ones for longer hair, up to 3 or 4 inches across.
Using Gel, Setting Lotion, or Pomade for Control, “Screw” Hair into a Taut Rope
Simply work holding product into the hair one section at a time, and, starting at the roots, twist each section between your fingers as if you were turning a doorknob.
Work your way down the hair shaft, keeping tension fairly high, until you are holding the very end of the section away from your head, like a rope.
Coil the Twisted Length around Itself and Secure In Place
By far the trickiest part of the procedure, yet so easy; Still working one section at a time, give the “rope” you have just created a few extra turns; the hair should start to coil in on itself like a spring.
After a few turns, you’ll have a nice base coil around which to wrap the rest of the twisted hair.
In doing so make sure to wrap each layer closer to your head than the previous one, bringing the ends of your hair closest to your scalp. On longer hair, this will create a sort of “pyramid” or funnel shape, while shorter locks will have a rosebud or baguette looks to the knots.
Repeat Steps 5 And 6 on Each Section until All of Hair Is Knotted
As this is a wet set hairstyle, feel free to mist hair with water from a spray bottle if it starts to dry during the process. E ither way you choose to go, knots or a knot-out, the final step is to mist hair with a bit of hairspray, spritz, or oil sheen; head out the door to turn heads with your brand new, gorgeous style.
CLICK HERE FOR MORE...
Fashion of Wednesday, 3 December 2014
Source: Bernice Owusuwaa


